Sunday, September 16, 2012

Nail Kit


Well from painting and practicing, my nails need a break so I haven’t been able to post anything new and I am sorry for that ladies.
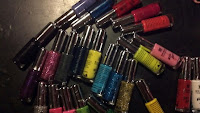
So I figured I would share with you lovely ladies my nail kit and tell you where I bought some of my items and if I think it’s worth the price I paid.


I received the case as a gift it was meant to be a makeup box but it hold almost everything perfectly. I have more nail polishes that did not fit in the case but the ones that do not fit are still always nearby.
I received almost all my nail polish in bulk from  Amazon 

48 bottles of polish and 3 small scented nail polish remover pads for only $ 42.00.
Amazing deal! I couldn’t pass it up.
I love the color selection and I LOVE the glitter polishes. They are not the most amazing brand or quality unfortunately, but for the price it’s worth it. My two biggest cons with this kit is I couldn’t pick out the colors I wanted and I was worried about getting double colors or a lot of unflattering colors (which thankfully wasn't the case), my other con is that some of the colors seemed to have got gooey really quick. So here is a tip I just learned (too late of course). To keep nail polished smooth you can store them in a refrigerator, but this will not work if you are going to use the colors often you should store bottles you don’t use frequently.   
I loved the nail polish removers that came in this kit. They are acetone free so they don’t have that harsh smell. They also have cuticle oil in them so they are nice on the nails. It was also good that I could use one pad most of the time to remove the nail polish on all ten nails.  My con with these (but it’s not really a con because it could happen with any cotton pad) the pad shreds when you remove the glitter polishes.


 I also purchased this decorative nail polish also from Amazon in bulk. They came in a pack of 24 for $25.


I also love them the brush is so thin and to you can make some really impressive designs with them.  Same complaint as with the regular nail polish it gets the gooey clump that makes it near impossible to use.

   Nail polish pens also purchased on Amazon ( I really love Amazon) 

Okay these pens are awesome! They are pens and also mini bottle of regular nail polish all in one. They came with this nice little sleeve that gives you some really pretty design ideas (that’s where I got the idea for the lady bugs), It also came with a pin to clean out the tip if it manages to get clogged.  They are really easy to use and helpful. I don’t really have a complaint with this product. I am happy with this purchase.

 Stamping Kit.
My stamping kit I had to order in 3 different orders so instead of posing the link to each item I will post one general link on Amazon that shows each part.


There is no point in reviewing each item individually.  As a hole this product is great, once you figure out how to use it a way that works best for you. I had a hard time at first getting all of the nail polish to transfer from the plate to the stamp.  I have a blog on how to stamp if you are interested in learning how to stamp. The other problem I had at first and still experience from time to time is getting the stamp straight on my nails. But that comes more easily with practice.

  M.A.S.H Nail paint brushes. 

I am sorry guys I don’t have a link for this item because I don’t remember which website I got them on and I forgot to save the link.
I haven’t used these brushes much because I haven’t needed them for what I have been doing. I used them once for these colorful nails.

 I had a lot of fun with these nails; I think I will try them again with different colors. I think I may have my next blog! I do enjoy these brushes. A good purchase!

Well that’s almost everything in my kit. Except Nail Polish remover currently I am using regular drug store brand that has acetone, I am using cotton rounds same thing regular drug store brand to remove my nail polish and I am also using Q-tips to clean up the edging of my nail and for some small mistakes.

Thank you for reading!! Have a lovely day, stay beautiful and confident <3

Love ya
Ally Mariee

Wednesday, August 8, 2012

Stamping 101


Hey laqueristas! Today I decided to do a stamping tutorial. I bought my stamping kit on Amazon. Its made by M.A.S.H.  The kit included the stamping plates, the scraper, and the double sided stamp as shown above. I had to purchase the special nail polish separately. I have tried it with my regular polish but it was just too thin to work properly. I had difficulty with this kit at first but found with a little dedication and persistence I managed to have myself a swell stamping kit :)

So once you’ve gathered all your materials you can get started. I DO NOT suggest stamping directly on your nails. Always put down a base coat as the stamping nail polish may stain your nails if you apply it directly to your nail. As you can see I’ve chosen a lovely purple. I also suggest cleaning up your nails before you stamp them to make things easier on yourself.
Lavenbaby 
 For my stamp I've chosen a couple stars. I suggest getting a scrap piece of paper to practice stamping on first as you need to figure out the correct amount of pressure to make it work properly. And also to practice lining it up and rolling the stamp on, getting a partial stamp on your nails is frustrating. So in the picture below i have my white polish on my stamp plate. And in the further picture you can see I've used my scraper to squeegee off all of the extra polish.


 So once you've done that the second step it to FIRMLY press your stamper onto your plate to transfer the design. Then quickly and firmly press the stamp onto your nail where you would like the design to be. Please keep in mind that nail polish you are supposed to use for this dries extremely quickly. So the process of transferring the design from plate to nail must be done as quickly as possible.
 And voila! A perfectly cute design that is easy to do and will impress even the most uninterested laquerista! Hope you enjoyed this and as always please feel free to comment if you have any questions, or just an opinion!
Seeing stars.

The materials I am using.

The materials used in this blog:
Kleancolor Nail Laquer- Lavenbaby
M.A.S.H stamping kit
KONAD Special Nail Polish- White (I also have it in black)

If you would like a bigger selection of stamping colors available click here

Tuesday, July 24, 2012

Nail Myth 1

I found this cool website about myths of nails. So, I figured every so often I’ll share some of the myths. I will also credit the website each time I use their tips.

Myth 1 : Eating gelatin will strengthen weak nails. While it’s true that nails are made of a protein called keratin and that gelatin too is a protein, there’s never been any scientific proof that gelatin does anything to strengthen nails. By the same token, despite the fact that there is trace amounts of calcium in the nail, downing more milk or other calcium-rich products won’t do anything to strengthen nails either. Overall good nutrition, including adequate protein, is the way to go for strong nails.”


I usually hear the complete opposite, not from any websites or anything, just through word of mouth. I heard that the calcium-rich diet is really good for your hair and nails. So you decide which you want to believe. Personally I believe the website it definitely makes since.    
 
 
 xoxoxoxo
Ally Mariee

Wednesday, July 18, 2012

Free Hand Lady Bugs

Okay so I Figured Id start this blog with an easy design Lady Bugs. 


For the base I used Kleancolor Nail Lacqure - Color number 81 Red Alert For the tips and wings I used Shiny Color Nail Art Polish ( the brush is thin  you could always use any thin paint brush)- Black 
For the dots on my wings I used Magi Nail Art Pens- Black


Step 1: Paint your base coat red. You may need to add more than one coat; I had to use two coats. (Don’t worry if you make little mistakes everyone does)


 Step 2: You paint your tips black you can make the black as thick as you want. But try not to make to thin because the tips are the lady bugs head. 

I use my "decorative" nails which are the ring and thumb fingers, but you can use which ever fingers you prefer.


 Step 3: Paint a straight black like down the middle to separate your wings.


   Step 4: Add the dots for the wings. (I apologize that my polka dots are hard to see)


 Voila Cute little lady bugs :-)  


 Thanks for the fun ladies please have a wonderful day 
xoxox 
Ally Mariee